

When trying to understand Army doctrine, we tend to get too tied up in the gritty little details of doctrine itself. An example of this would be any number of the required briefings that come with with Military Decision Making Process (MDMP). Staffs spend more time formatting the briefing products – whether on PowerPoint or Command Post of the Future (CPOF) – and tailoring to meet the expectations of the boss than they do on the actual analysis of the mission. In essence, the brief becomes an exercise in the self-licking ice cream cone: briefing for the brief’s sake.
In order to break out of this mold, it’s useful to get back to the fundamentals of warfare. To do that, we can examine past battles or – as has been the wont in this series- look at fictional engagements in literature. But we are in an era now where the line between conventional and irregular warfare is more of a gray area and where technological advances are outrunning our command and control systems. Because of this, it is perhaps useful to look back to history rather than into science fiction. And the American Revolution offers no end of examples.
With all that in mind, let’s turn back the clock a little to June 17, 1775 and place ourselves in Charlestown, Massachusetts at the Battle of Bunker Hill.
Following the running battle of Lexington and Concord that past April, the mix of provincial forces and militia (about 12-14,000 men) that composed the Patriot army had surrounded the city of Boston where about 7,000 British Regulars were situated. Because of the complicated terrain of Boston and its environs, the Patriot forces were not yet in a total siege; the British still retained freedom of movement due to their control of the open waters and sea lanes around the area of operations. Although the Patriots controlled much of the countryside, they were still vulnerable to rapid strikes by joint British Army and Navy task forces. The Patriots lacked the heavy guns needed to press a proper siege that could threaten the fire support platforms of the Royal Navy.
The Patriot forces were primarily composed of light infantry and irregulars, backed by limited batteries of field artillery. The force was also very low on bayonets, which at the time marked a serious gap in capability because the goal of 18th century warfare was to close with the enemy and force them to retrograde with a bayonet charge. Its strength lay in its numbers and morale, since the soldiers were fighting on their own soil.
While the British were less in number, they retained significant advantages in fire superiority and ability to move at will on the sea. They also maintained effective and efficient artillery capabilities in their ground forces.
Early in June, the British assessed that they were vulnerable to the heights in Charlestown (Bunker and Breed’s Hills) if the Patriots could manage to dig in artillery there. Consequently, they began plans for seizing these heights which lay across the channel from Boston.
Mission Command
On the British side, the overall joint commander was General Thomas Gage, while General William Howe commanded the field component. Although there were quite a few surplus general officers at the British headquarters in Boston, Gage delegated the majority of authority for operations on the ground to Howe. In contrast, the Patriots did not have a solid unity of command. Major General Artemus Ward had overall command, but did not delegate field authority for the battle. Thus, local commanders executed as best they could. Brigadier General Israel Putnam had command of the Connecticut troops, Colonel William Prescott maintained the Massachusetts troops, and Colonel John Stark commanded the New Hampshire troops. These were all excellent tactical commanders but with no field commander, the Patriots were already bereft of operational leadership before a single shot was fired. However, each of these commanders exercised their judgement to make decisions concerning dispositions in and around their area of operations.
Communications were restricted to runners when on the battlefield, or signals from musicians. The British were impeded by the necessity of crossing the strait between Charlestown and Boston which continuously slowed communications and degraded the ability to control actions in real-time. However, since Gage had given Howe direct field authority, much of the risk of having divided forces was negated.
Intelligence
The Patriots maintained an active and resourceful intelligence network in Boston that enabled rapid transmission of enemy information from British headquarters to Patriot lines. It was in this way that the Patriots were warned of the British plan to occupy and fortify the heights in Charlestown.
On the British side, they maintained their own spies but did not have the advantage of working within the local populace. Once operations commenced, the British neglected to do a proper intelligence preparation of the battlefield by conducting on the ground reconnaissance. Worse, when facts on the ground ran counter to their assumptions, they did not change the plan to account for it.
Protection
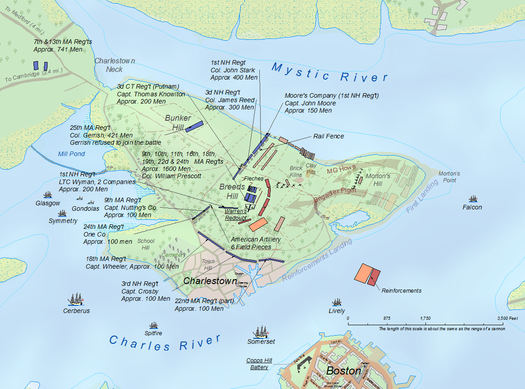
On the night of June 16, Col. Prescott with chief engineer Richard Gridley and about 500 men crossed Charlestown Neck and occupied Breed’s Hill. Equipped with survivability equipment, they began construction of a fighting position on the height of the crest. During the night, ISR assets on the Royal Navy ships in the harbor spotted the movement and called for fire on the hill. Rounds began to impact, but the guns soon fell silent: Admiral Richard Graves had been awoken by the firing and ordered the men to cease fire. Working all night, the Patriots dug a substantial fortification on Breed’s Hill with earthworks and firing platforms. When the sun rose, the British found that the height had been seized and fortified.
During the morning hours, more men arrived on the neck and began improving the fighting positions. An earthen trench was constructed down the left side of the redoubt. Just behind it, the New Hampshire and Connecticut troops constructed additional defenses extending to the left using log fences and stone walls to erect a position that ran down the slope towards the Mystic River. Between the fence and the trench, pioneers dug three v-shaped trenches to tie in the trench and the fence. This still left the extreme left vulnerable to flanking parties moving along the coast, so Col. Stark led a detachment down the bluff to the river and emplaced a series of rock walls in depth. He then placed detachments of marksmen behind each wall, with strict fire control measures. He drove a stake forty yards in front of this position, with instructions for his men to aim at the enemy’s feet; this compensated for the natural rise of the musket and would place their fire center mass.
Arrayed across the dominant heights, the Patriot forces overlooked the key terrain where the British would have conduct an amphibious landing. Between this beach and the heights lay a series of swamps and rail fences that served as natural obstacles that would disrupt British movement and maneuver.
Secondary fighting positions were constructed on Bunker Hill to the rear of Breed’s Hill to serve as a fallback position for Patriot forces should they be forced to retrograde.
Fires
With their navy, the British brought significant fires dominance to the battlefield. Naval gunfire began again in the early morning hours of June 17 to suppress the Patriot lines. Over 100 guns were brought to bear on the enemy lines. This sustained fire was also meant to disrupt Patriot movement, but the natural lay of the land allowed Patriots to maneuver their forces in relative safety. In the afternoon, the British landed 12 pound and 6 pound batteries on the beach to provide additional suppressive fire.
The Patriots had four guns in position between the Connecticut and Massachusetts troops, but their gunners abandoned the field prior to the battle and so negated the majority of effects of the guns.
Sustainment
The British were forced to move all supplies via boat across the river, slowing their rate of supply and reinforcement significantly. The 6 pounder battery commander neglected to conduct a precombat inspection prior to deployment and found to their chagrin that their caissons were filled with 12 pound shot rather than 6 pound shot. This denied General Howe his mobile fire support that he was counting on for close in fires.
On the Patriot side, they were already dangerously short of gunpowder. Each soldier had only about 30-40 rounds of ammunition. Lack of an overall field commander meant that there was no one individual tasked with overseeing logistics from the assembly area to the forward line of troops. This oversight would play an outsized role in the coming fight.
Movement and Maneuver
In temperatures over 90 degrees just after noon on June 17, twenty-eight barges landed on the beach about 1,000 yards from Breed’s Hill and the first British task force of grenadiers, light infantry, and Royal Marines landed. William Howe rapidly assessed the situation and determined that he would need more troops to carry the enemy positions. The barges made two more troops, until about 2,300 British troops were assembled on the Charlestown Neck.
Across from them, the Patriots could count just around 900 troops. 400 men from New Hampshire and Connecticut manned the left, 200 Massachusetts troops held the trenchline, and 150 men were deployed in the redoubt. An additional 150 men were deployed in screening and harassing parties in front of the works and in the buildings of Charlestown proper on the right flank.
Howe task organized his force into two wings, the right commanded by himself and the left by Brig. Gen. Robert Pigot. Howe then further divided his right wing into three groups. Ten companies of grenadiers formed the fixing force that would demonstrate in the center to tie down Patriot troops. Ten companies of light infantry would form the assault force that would sweep around the Patriot left flank and endeavor to come in from the rear along the beach. Howe kept the 5th and 57th Regiments back as his exploitation force. Once Howe’s force was fully engaged, Pigot’s force of the 38th, 43rd, 47th Regiments, and a battalion of Royal Marines would skirt the Patriot right through Charlestown and sweep around from the flank.

Around 1500, the British began to maneuver on the enemy. As the fixing force slowly moved into position, the assault force of 200 men rounded the corner of the beach and were surprised to find fighting positions blocking their route. Due to the terrain, they could only deploy fifteen men abreast in ranks twenty deep which negated their numerical superiority. Thus canalized, the first company was wiped out in the first two Patriot volleys. The second company assaulted and made it only yards further before they were given the same treatment. Stark’s defense in depth and superior fire control caught each company in turn as the redcoats assaulted over piles of their comrades. In a period of ten minutes, the British lost 96 men killed and dozens wounded. The assault force had been decisively defeated.
In the center, Howe’s grenadiers slowly advanced, burdened by heavy packs and equipment. Awaiting them were the Patriots along the fence and trenchline, comfortable in shirtsleeves. The grenadiers were slowed by the natural obstacles that disrupted their lines. At seventy yards, the Patriots ordered their first rank to fire to bait the British into halting and returning fire. This worked, further disrupting the British lines. The 350 grenadiers now rushed forward to close the distance as the British artillery lifted their fires to prevent fratricide. At around forty yards, the defenders opened fire. The mass and concentration of fire cut the grenadiers to pieces. Howe deployed his reserves which received a similar treatment. The grenadiers took 80% losses, while the reserves had their relative combat power cut in half. Howe’s naval liaison and task force engineer were both hit as well.
The left wing was now advancing through the burning buildings of Charlestown, as Howe had given the navy orders to shell the town to drive out the marksmen. This decision turned more of the local populace against him while it did little to disturb the marksmen who still used the buildings for cover. Since he could not advance with his flank uncovered, Pigot deployed his Marine battalion to flush the Rebel sharpshooters from the town, effectively reducing his combat power for the main assault. Pigot was also uncertain whether he was the decisive operation or the shaping operation, so his assaults launched at the redoubt were poorly coordinated. This allowed Prescott to shift troops from each side of the redoubt to counter each new assault. His attack disintegrated under accurate and sustained fire.
Howe then consolidated his troops and aimed for frontal assaults to bring his own superior numbers to bear. In an attempt to break through the rail fence, the British advanced to within thirty yards of the position before again being repulsed by heavy fire. Pigot’s second attack fared the same as his first, and both prongs of the assault pulled back. The 2,300 British troops had taken nearly 900 casualties.
However, sustainment in the Patriot army had completely collapsed. The defenders were now down to their last few rounds. Howe, reinforced by one regiment of foot and the 2nd Battalion of the Royal Marines assembled his forces for one more attack. This would converge all available combat power on the trench and redoubt, while his now-resupplied field guns would suppress the enemy along the fence. Howe realized that he needed to move as quickly as possible, so he permitted his troops to drop their packs and jackets. Personally leading the final assault, the British troops were met by severe fire as before, checking their advance. But compelled forward by the leaders, the assault force recovered and continued the charge.
Out of ammunition, the defenders now braced for the close-in fight. Lacking bayonets, they were pushed back and the British recovered the initiative. The remnants of the Patriot force in the redoubt retreated rapidly, covered by the skillful fire of the New Hampshire and Connecticut men who pulled back as well. The British then ran up against Bunker Hill, but since there were no qualified Patriot leaders overseeing the secondary position and it had been under naval gunfire all day, they were able to eventually break this line as well. Howe now had both hills in his possession and faced a decision point: press on and attempt to inflict a decisive defeat on the Patriot main army, or hold on to what he had?
Howe chose the latter, digging in on Bunker Hill. But although the British had taken their objectives, they had lost something intangible: the moral initiative. His task force had been reduced to half its size, with 268 men dead and over 800 wounded. The Americans could count about 500 losses in comparison. But Howe’s losses were more significant: they included the decimation of his elite flank companies and Marines. In addition, he had lost nearly 100 officers, making up 25% of the British officers in North America. His single-minded obsession with carrying the heights left his small army crippled.
As news of the battle spread, the Patriot cause received a substantial increase in volunteer regiments that arrived to continue the siege of Boston. By deciding to contest Charlestown, Howe had essentially doomed his campaign around Boston. Worse, the British now knew that the Colonials would fight – sometimes to the death – and that they were facing a force that they underestimated at their own risk.
Summary
Maximizing protection, fire control, and interior lines, the Patriot leadership had inflicted heavy losses on their enemy. However, not having proper lines of supply and no unity of command ultimately doomed this small force. On the opposing side, the British ultimately failed at terrain analysis and the ability mass their forces on one point. Movement and maneuver without direct communications are incredibly difficult tasks to manage; something that modern commanders would do well to understand and to train for.
Enjoy what you just read? Please share on social media or email utilizing the buttons below.
About the Author: Angry Staff Officer is an Army engineer officer who is adrift in a sea of doctrine and staff operations and uses writing as a means to retain his sanity. He also collaborates on a podcast with Adin Dobkin entitled War Stories, which examines key moments in the history of warfare.


Excellent article about the battle and analysis of the planning and decision factors that shaped it — but I don’t see where the article has anything to do with the opening paragraph.
LikeLike
I think that the point is to shift focus from process for its own sake back on to the principles of actual warfighting…
LikeLike
Just thought you’d like to know when touring Bunker Hill the Warren Tavern is only 2 blocks south on Pleasants Street. Excellent beers, ales and food. They also make a mean G&T!!!
LikeLiked by 1 person
I really enjoyed this analysis. It brought the battle to life using familiar terminology and lingo. As someone who struggles with how historical battles are described this was really refreshing. Now I want to go walk the battle field! Maybe pop into a pub along the way too…
LikeLike